
How to Optimize Your Instagram (IG) Profile As A Plastic Surgeon
An easily identifiable username with a recognizable profile picture combined with a steady stream of photos, stories, an informative, cohesive-looking bio and a link to your most recent campaign can go a long way in improving your visibility on Instagram; thus, increasing your followers.
Here is How to Optimize Your Plastic Surgeon Instagram (IG) Account
Page Setup Tips to Optimize Your IG Profile
A successful Instagram marketing campaign requires a specific formula be used for your profile page setup. Using the tips below, you can optimize your IG profile by increasing your visibility to attract new followers.
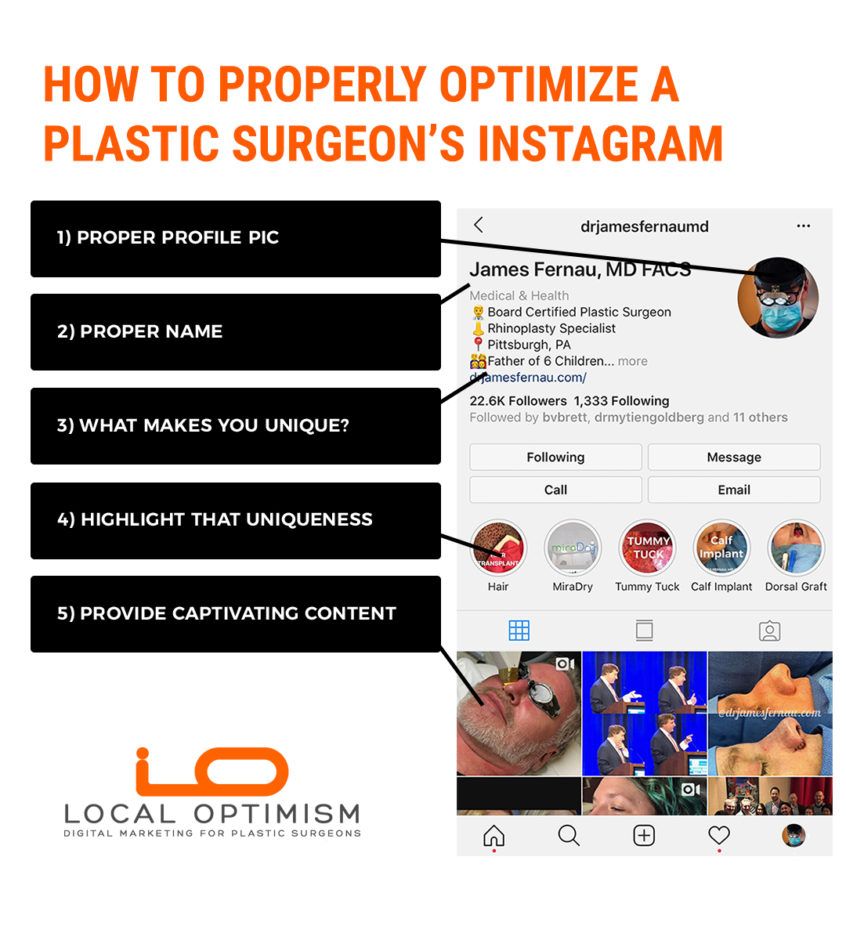
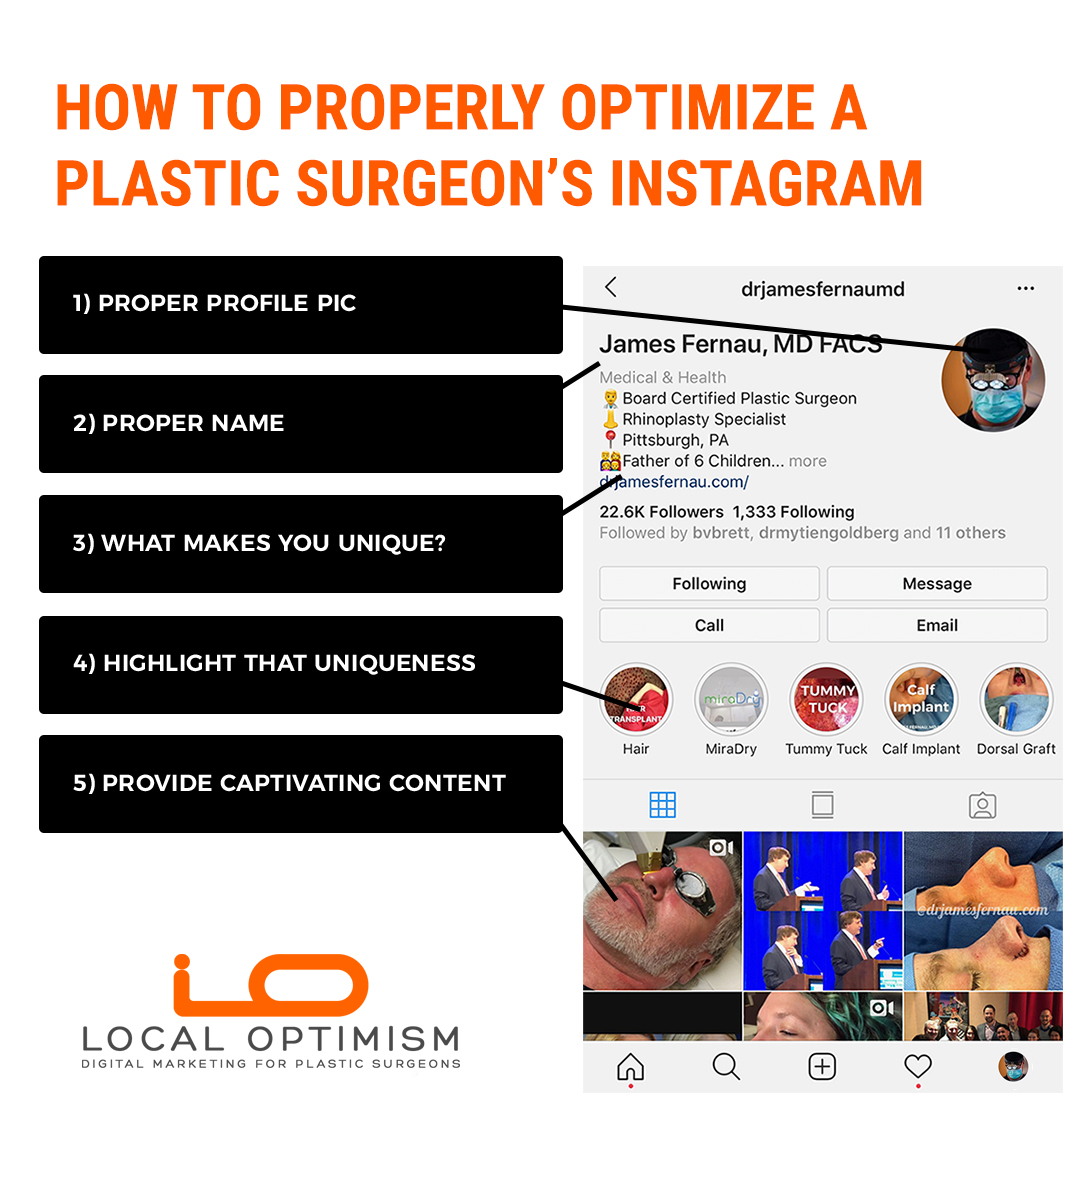
Optimize Your Instagram Account by Using Your Brand Name and a Profile Pic
Your name and profile pic must be branded.
Avoid being nonspecific here. You must have your full business name in the ‘name’ section of your IG profile. This is extremely important as this is the name that appears under your username in a search. This is also the name that is visible beneath your profile picture.
If you need to edit your business name, here is how:
1. On your profile page, click ‘Edit Profile.’
2. Click on the open space next to the clipboard icon at the top or on the text.
3. Enter your full business name.
4. Click ‘Save’
Keep your profile picture consistent across all your social networks:
Use the same profile picture across all your social networks, this allows people to recognize your brand quickly. Most surgeons use their logo or a head shot of themselves.
Optimize Your IG Account by Making the Most of Your Bio
You only have 150 characters to introduce yourself so make it count! Let people know who you are, what your business offers and highlight something unique about yourself.
LINK IN BIO
Add a link to your website in the ‘Website’ box located within your bio. This is the only place Instagram allows you to place a clickable URL. In this ‘Website’ field, you can link to your most recent campaign, a blog post, a YouTube video or a specific product and you can change this link as often as you like.
Here is how to change the link:
1. On your profile page, click on ‘Edit Profile.’
2. In the URL box, just insert the URL you want to link to.
3. Click ‘Save’
Stories Must Also Reflect Your Page’s Overall Design
Keep in mind that each of your stories needs to have an interesting, eye-catching highlight that is consistent with your page’s design.
Make sure your IG profile is visible.
Having your page set to public ensures that everyone around the globe can view your page.
Typically, profiles are set to public by default; however, you should still check, here is how:
1. Open ‘Options’ (on an Android, choose the three dots or on an iOS, choose the gear button).
2. Make sure that ‘Private Account’ is off.
Having your profile public is extremely important because when it is private, visitors will not be able to view your photos, which could cause them to view your business negatively and deter them from following you.
Check your notification settings.
Once you enable notifications, you will be able to see when people comment or share your photos. Turning your notifications on will allow you to engage with your followers quickly and easily.
Checking your notification settings:
1. Go to your ‘Options’ menu.
2. Choose ‘Push Notification Settings.’
3. Select ‘From Everyone’ for all categories, except the ‘Friends on Instagram’ and the ‘Instagram Direct Request’ categories.
Here is why you should avoid selecting the two categories that are mentioned above:
- If you choose the ‘Friends on Instagram’ category, a friend request is automatically sent to every one of your Facebook friends who has an Instagram account.
- If you choose the ‘Instagram Direct Request’ category, photos from individual accounts are automatically accepted by your account, which could result in a lot of spam.
Post to Your IG Account Regularly
Creating high-quality content is vital to optimizing your business’s Instagram profile. Be sure to take advantage of the social media content calendar templates available to keep track of your postings.
Research indicates that the best time to post on Instagram is on Mondays and Thursdays at any time of the day, except between the hours of 3pm to 4pm for your time zone. In the U.S., combining Central and Eastern time zones is the best bet because they represent nearly 80 percent of the entire population. However, you can determine when the best time is for you to post by performing a post-frequency optimization test.
Customize Your Best Time to Post by Determining Your Post-Frequency Optimization
To optimize your IG account and get the most out of your postings, you can monitor your page to determine when your followers are interacting with your content. You need to find out when the best time is for you to post and how many posts your followers are receptive to in a single day: This process is referred to as post-frequency optimization.
Use High-Quality Photos to Optimize Your IG Account
The quality of the photos on your Instagram play a role in whether an individual decides to follow you or not. If you have nothing beautiful to post, then just do not post anything at all.
The three elements of a quality photo include:
1. An interesting, relevant subject.
2. A well-shot, well-framed photo.
3. A photo that has been beautifully edited.
1. An Interesting, Relevant Subject
Although as a plastic surgeon you will need a professional photographer to create the model photos displaying your skills in facial rejuvenation and body enhancement techniques for your IG profile, you should be able to create some of the product photos for your profile on your own using just your smartphone and a couple apps.
Some of the most important aspects of creating an amazing product photo include finding interesting perspectives, lining up the shots and taking full advantage of patterns, ‘leading lines’ and symmetry. All of which can be done with the product you are targeting and a smartphone.
2. Tastefully-Framed, Well-Shot Photos
During the editing phase, you can choose your frame; however, while you are taking the picture of your product, do not be afraid to take your photos from different vantage points and in various types of lighting. Learn how to use all your camera’s capabilities (e.g., burst shots, the HDR filter, etc.).
If you no longer have your smartphone’s instruction booklet, just look online. One of the most important things to remember before taking your picture is to clean the lens. If available, use a cotton swab lightly dampened with distilled water or a lint-free cloth.
3. Use a Variety of Apps to Edit Your Photos
Although Instagram has photo editing capabilities, branch out and find some of the other photo editing apps that are compatible with your smartphone and use those to edit your product photos even before you open them up in Instagram for the first time. Once you find the right apps, with a little practice, you will be editing your photos like a pro in no time.
Optimize your account by making people laugh. Sometimes a funny or silly photo is the most shareable!